
Unlike many parents, I always strive to reduce my kids' screen time. With digital learning taking center stage, I want them to have enough time for outdoor play or any physical activity to balance out their screen usage. However, I must say, it's incredibly challenging to manage today's generation on my own terms. To tackle this, I decided to spend quality time with my kids by playing online educational games. This way, I have control over what they are watching or doing on the internet. While searching for various online educational game sites or apps, I came across CulinarySchools.org , and we decided to try some of its educational games. I really love these games, as they provide a great way to bond with my children while learning together! Games for Children The Culinary Schools website boasts a wide selection of games focused on cooking, education, and more. The best part is that there’s no need to download any apps; you can simply browse the website and play numerous...

Hello..
I am too lazy these days to paint my nails... Anyway as Independence Day is round the corner I decided to draw a nailart inspired by this and end up drawing few designs.. I will share one by one.. Well, today I am going to share a new technique tried by me to draw the flag pattern... It's the dry marble /drag marble technique and I have tried to resemble the flag in a swirl pattern... Hope you all will like it... Below is the step by step tutorial with pictures..
My last year Indepence Day inspired nailart tutorial is HERE ..
Products I Need -

1- White, Green and Orange nail polish
2- A clear coat
3- A toothpick/niddle
Steps-
1- First apply a clear coat to save the nails...
2- Then apply the orange nail paint at the top of nail, then white and then green at the end (apply little more quantity)... The pattern is like a flag .
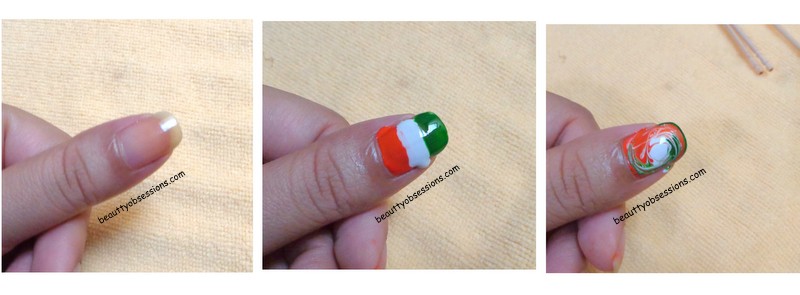
3- At this step you have to be very fast and don't let the colours dry otherwise it will be difficult to drag the colours and it will look messy. Now take the toothpick and very gently drag the colours in clockwise direction to form a swirl pattern..
(Note:- At a time draw only one nail otherwise the colours will dry and you can't drag these...)
4- Then let it dry completely and apply a top coat to lock the art...
Done... 😊


I have also some more Independence Day designs... will share on my next post...
Hope you like this design... Do share your feedback below..
Love xoxo
❤❤
you made it look so easy-peasy :)
ReplyDeletehttp://senseiteve.com
http://twosomelife.com
This is so beautiful! Must say a good idea and can be done with other colors too!!
ReplyDeleteThe nail art looks amazing. I will try this on my daughter's nails she will be so happy.
ReplyDeleteYou've given the independence day nail look a nice artistic twist. Very pretty.
ReplyDeleteWow.. Such a great nail art. I am surely going to try it :)
ReplyDeleteWow just amaizng nail art. Superb design and beautiful colour combos. Great work done by you.
ReplyDeleteWow just amaizng nail art. Superb design and beautiful colour combos. Great work done by you.
ReplyDeleteAwesome. Loved it. It looks techie but you explained it very well
ReplyDeleteYour nail arts are so amazing dear... Love this one too
ReplyDeleteI'm so impressed! It's super easy yet so beautiful
ReplyDeleteWow i loved how you made this beautiful abstract nail art.. themed fir independence day..
ReplyDeleteThis is an easy and beautiful nailart. Love the tutorial too.
ReplyDeleteBeautifully done! I can never be as creative with nailpolish ever!
ReplyDeleteThat's looks super amazing but so easy peasy. Never thought that it is a 2 step tutorial. Love it.
ReplyDeleteI believe this is really creative! Completely loved the pattern! Gonna try it out :)
ReplyDeleteOh my god how do you do this. Its look absolutely fabulous and totally in sync with the upcoming Independence day.
ReplyDeleteLooks amazing on your nails. Independence Day must be celebrated in every possible way!
ReplyDeleteSo simple yet so fascinating!! Loved the tricolour themed nail art!
ReplyDelete